Tuesday, March 22, 2011

Directional/cardioid vs. omnidirectional microphones

Microphones can have different directional characteristics. Omnis that pick up the sound all around them, and cardioids that mainly pick up the sound directly in front of them. Other directional patterns are: bi-directional/figure 8, super cardioid, hyper cardioid, and wide cardioid.

Generally a cardioid sounds appealing, since in a musical setting you only want the sound source and rarely want to record or amplify the surroundings. But directionality has a price and that sometimes is not worth paying.

Directional microphones need to have a much softer diaphragm than an omni. This softness results in handling, pop & wind noise which puts a limit to how close you can get to a vocalist, even when using pop-filters.


A directional also suffers from proximity effect, which means that the closer you get to the sound source the louder the low frequencies get.


The proximity effect exhibited by the cardioid microphone 4011A

A cardioid microphone can be adjusted to be linear at the distance it is normally used. A vocal microphone for live use, for example, is adjusted to be linear at a distance of approximately 1 – 2 cm and at longer distances the low frequencies drop dramatically. A studio microphone is typically adjusted to work at a longer distance. In the example of the DPA 4011A, when used closer than 30 cm it gives a low frequency boost, and when used further than 30 cm it gives a low frequency roll-off. That means that from any other distance than 30 cm equalization is needed unless the proximity effect is desired.

Additionally the off-axis sound of a cardioid is less linear than that of an omni. It is very hard to reduce the level of sound taken in from the sides without some coloration, and some directional microphones have a notably poor off-axis response. This means that sound entering the microphone from the sides and the rear are more or less strongly colored – the industry names this "the curtain effect". This effect can be seen on the microphones polar pattern as ‘spikes’.
On the other hand, miking live with high level monitors can make the omni mic feed back, which makes the cardioids more suitable for this application, although the use of in-ear monitors reduces that problem.

If you choose an omnidirectional microphone, channel separation may be less precise than with a directional microphone, because the omni will pick up sound from all directions. Therefore, if channel separation is preferred, the ratio between direct and indirect sound can become more unfavourable with an omni. The omni, however, can be moved closer to the source, without the penalty of proximity effect. As a general rule it can be said that if we place a cardioid at a distance of 17 cm to the source, then an omni placed at 10 cm gives the same ratio of direct and indirect sound as the cardioid.

Relative distance to sound source for equal balance between direct and indirect sound

Multi-pattern microphones with both omni, bi-directional and cardioid characteristics will always compromise the sound quality. It may be very convenient to have a 3-in-1 solution, but the drawback is reduced performance in each mode.  Due to the need of a pressure gradient design, a multi pattern microphone in omni mode has many of the weaknesses of the cardioid, such as popping, handling & wind noise and a less linear off-axis sound. In fact a multi pattern microphone in the same mode can have different characteristics depending on the frequency.

Large vs. small diaphragms

Before choosing between a large and a small diaphragm microphone it is important to know the difference in features between them, and microphone behavior can not be compared with that of a loudspeaker when considering size.

A large diaphragm microphone is not better at reproducing low-frequencies, but it may be less precise in reproducing high frequencies, which may make it sound as if it has more low end.

Both diaphragm sizes have their respective advantages and disadvantages. This is illustrated in the table to the left.

A small diaphragm has a higher self noise due to the fact that the small diaphragm is less compliant and therefore more sensitive to the bombardment of air molecules that causes some of the self noise of a microphone. And since the large diaphragm is softer than the small, it is easier to move and therefore more sensitive – even at very low levels. This means that the small diaphragm, because it’s stiff, can handle a higher sound pressure without clipping or distortion, but is less sensitive and needs more amplification, which also adds a little noise.

When reproducing very high frequencies, large diaphragm microphones have a more limited range than the small diaphragms. This is caused by three factors:
  1. A large diaphragm tends to break up and will no longer act as a true piston. This phenomenon is also recognized in loudspeaker technology and is the reason why loudspeakers are manufactured with different sizes of diaphragms to handle different frequencies.
  2. The weight of the diaphragm will attenuate the displacement of the diaphragm for higher frequencies.
  3. The diffractions around the edges of the microphone capsule will limit the microphone's capability to handle very high frequencies.
ConclusionBoth diaphragm sizes have their respective advantages and disadvantages. This is illustrated in this table, which compares the specifications of DPA's small, medium and large diaphragm microphones:

How to read microphone specifications

When you read microphone specifications in order to compare different microphones, it is extremely important that you understand how to interpret them. In most cases the specifications can be measured or calculated in many different ways. This article is designed to help evaluate specifications in a meaningful way.

While microphone specifications provide an indication of a microphone's electro-acoustic performance, they will not give you the total appreciation of how it will sound – just as it is with cars. Knowing that it is a 3.0 turbo-engine with 4WD gives you an idea of a pretty good driving experience, but for the exact feeling, you need to drive the car yourself.
Frequency range/frequency response
Frequency range tells you the range of the frequencies (for example 20 Hz to 20 kHz)  that the microphone can pick up and reproduce, but not how well the different frequencies are reproduced. To see that you need the frequency response:

Ex. DPA 4006A Omnidirectional Microphone, P48

Here you see how linear the response is or if the microphone has any ‘spikes’. But pay attention to the scale on the left. The number of dB each step represents can vary a lot.

The frequency response normally refers to the on-axis response, which means from a sound source right in front of the microphone. The diffuse field response curve will illustrate how the microphone will respond in a highly reverberant sound field.

The off-axis response is also important to examine. A microphone always takes in sound from the sides too, the question is just how much and how good it sounds. In particular, directional microphones can, in their attempt to suppress sound from the sides, get an uneven off-axis response:

On-and off-axis responses of 4011A/4012/4011C cardioid microphones measured at 30 cm
Finally a polar plot can show the 360° response of selected frequencies. The response curves should be smooth and symmetric to show an uncolored sound. Extreme peaks and valleys are unwanted and the response curves should not cross each other. From the polar diagram you can also see how omnidirectional microphones usually become more directional at higher frequencies.


4006A Omnidirectional Microphone

Equivalent noise level /self noise
The equivalent noise level indicates the sound pressure level that will create the same voltage that the self-noise from the microphone will produce. A low noise level is especially desirable when working with low sound pressure levels so the sound will not drown in noise from the microphone itself. The self-noise also dictates the lower limitation in the microphone's dynamic range.

There are two typical standards:
  1. The dB(A) scale will weight the SPL according to the ear's sensitivity, especially filtering out low frequency noise. Good results (very low noise) in this scale are usually below 15 dB(A).
  2. The ITU-R BS.468-4 scale uses a different weighting, so in this scale, good results are below 25 dB.
Sensitivity, sound pressure level (SPL) handling & total harmonic distortion (THD)
Sensitivity tells you how well the microphone can convert the acoustic sound into electricity and according to the IEC 60268-4 norm, the sensitivity is measured in mV per Pascal (air pressure) at 1 kHz. The higher the sensitivity the better, because it reduces the need for amplification and therefore reduces the amplification noise.

SPL handling tells you how much sound pressure in dB the microphone can handle before it either clips (the diaphragm hits the backplate or the amplifier overloads) or reaches a certain level of distortion (THD or total harmonic distortion). Typically either 0,5% or 1%. The higher level of sound pressure before clip or distortion the better.

Example: DPA 4004 Hi-SPL Omnidirectional Microphone, 130 V:
Maximum sound pressure level: 168 dB SPL peak
Total harmonic distortion:142 dB SPL peak (<0.5 % THD), 148 dB SPL peak (<1% THD)
Monday, March 21, 2011

Logic pro:Creating Effects Samples Using Reverb Tails

Creating Effects Samples Using Reverb Tails

Step 1: Your Project

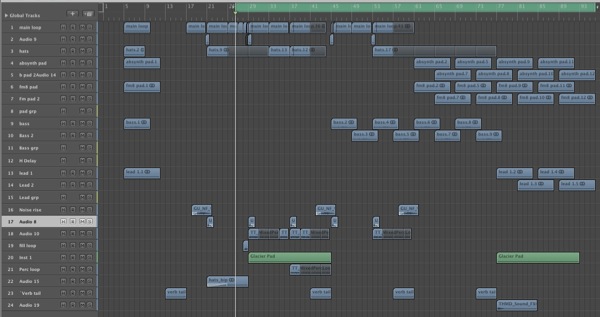
So here we have a simple project with a house feel. This may of been used in one of my previous tuts but it’s a great example of a project that needs some extra effects. Don’t worry if you work in a different genre this technique can be used regardless of style.
As you can see things are a little sparse at this stage and some atmospheric effects would really flesh things out. Of course you could delve into your sample library at this point but I’ll try and show you an alternative approach that you can use.


Step 2: Adding Some Basic Reverb

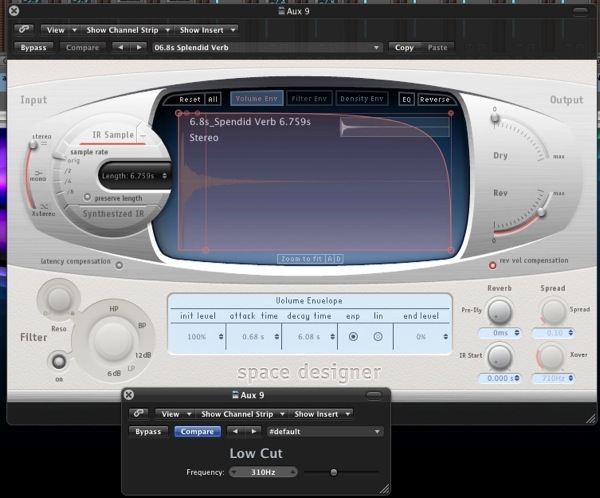
The first thing to do is to choose a key part of your project to process. I opted for the drum group as it had the most dynamic impact. I then set up a send / return configuration and added a reverb plug-in. I have used Logic’s Space Designer here but any quality reverb plug-in will do.

The Space designer used for the reverb effect.
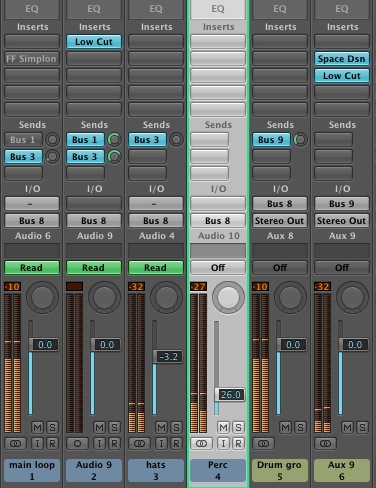
Most DAWs now come bundled with at least one serious reverb plug-in so you should find that there is something on your system, even if you haven’t installed any third party products.
I’ve gone for some thing pretty over the top here to make sure the effect I’m going for is clearly demonstrated but any patch with a decent decay time will get the job done. I’ve also used a simple low cut filter to ensure the reverb doesn’t contain any very low frequencies. This will keep things ‘clean’ and avoid the effect clashing with out low end mix.

The send/return configuration used.
The drums with a large hall reverb patch applied

Step 3: Isolating the Effects

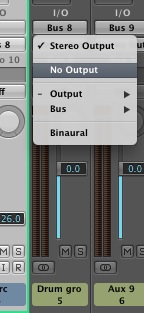
So we now have our drum loop heavily reverberated, the next step is to grab the effects signal in isolation. This will give us the raw material we need to work with. This part of the technique will differ slightly in every DAW but in Logic you can simply send the drum group to ‘no output’. This leaves the send and return set up intact while our dry signal is completely removed from the mix.
You should now hear your reverb return completely ‘wet’ without any of the original dry drum loop. At this point we are ready to start exporting the results.

The dry channel is turned off.
The reverb is isolated.

Step 4: Exporting and Importing the Result

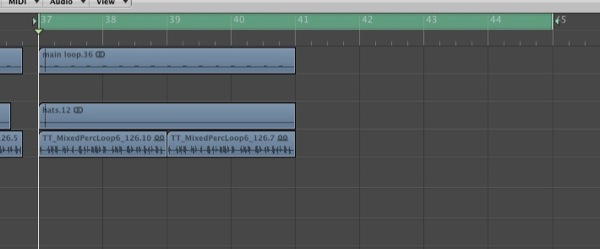
With our reverb isolated we can now export the results so we have a file that we can edit and manipulate. To do this simply select the area you want to capture using Logic’s locaters. (Most DAWs have a very similar system for capturing and bouncing audio).
In this case I have selected a good section of the drums and also an area after the drums stop. This means I’ll capture the tail that plays out. It’s a good idea to set the end point of your export to a point well after the reverb effect finishes. This means you’ll definitely capture everything you need. You can always edit out any silence later.

The required area is selected for export.
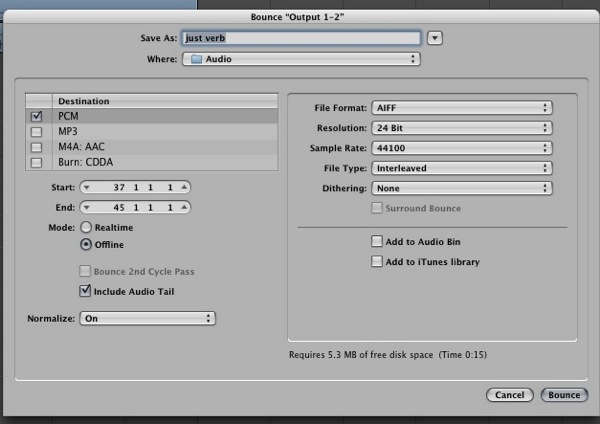
You may find that when you actually come to export your DAW supports a feature for automatically capturing effects tails. Logic 9 has this feature and it can save you a lot of time. I tend to select the area I need and tick this option, this may seem super cautious but I have been working without the feature for so long it’s more habit than anything else.

The export settings used.
With your reverb exported, create a new audio track and bring it back into the project. To ensure that any rhythmical elements that have crept into the reverb signal remain intact, it’s best to import to the same point you exported from. This should be easy as your locaters will still be int he same position.

The reverb effect is imported into a fresh track
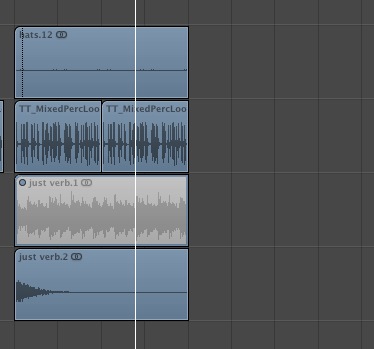
You can now turn your reverb unit off (or at least turn your send down) and reactivate the dry channel. You should now have total control over your new audio based reverb effect.

Plug-ins used to treat the sound effect.

Step 5: Trimming and Mixing the New Audio

It’s a good idea at this point to trim the new imported audio. So if there is any silence at the start or end, get rid of it. This just makes any further editing easier and means that any reversed audio is perfectly in time.
If your tail ends a little early and you can hear it cut off you can also add fades at this point to ensure a smooth finish.

Step 6: Reversing and Automating Your New Effect

Now we come to the bit that real makes this effect work. You can now remove the tail from the audio clip, in my case I grabbed the section after the drums had finished. This can be used in it’s original state as a crash effect or can be reversed to create a rising effect.

The trimmed tail is used as a simple crash effect.
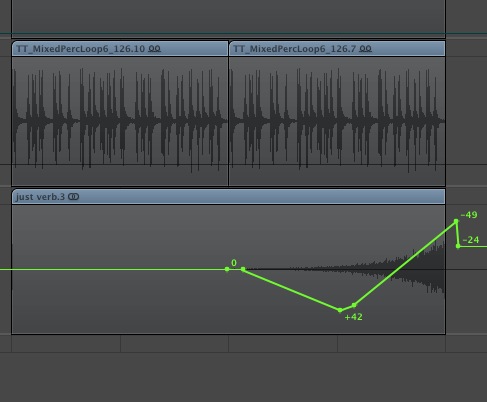
The end of the reverb tail is used as a crash like effect.
… and then mixed with a real crash sample for impact.
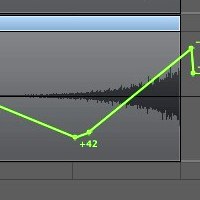
For some extra spice and variation try automating some pan or filter effects to your new section of audio. You can also use the preceding section of reverb as a another effect or backdrop. Any part of the reverb export will work in your project because it originates from your original audio parts. You can comfortable in the fact that you can drop it anywhere in your track and it will blend organically.

The effect is then reversed and some pan automation added.
The reversed audio with some automation.
You can also try the same technique with delay based effects tails and remember you can process the result in any way you like to create some much more complex and rich effects, so let your imagination run wild. Hopefully this will get you started and open a new area of effects processing for you.

Saturday, March 19, 2011

sound crew for a movie peoduction

Production Sound

  • Production Sound Mixer
The production sound mixer is head of the sound department on set, responsible for recording all sound during filming. This involves the choice and deployment of microphones, operation of a sound recording device, and sometimes the mixing of audio signals in real time.
  • Boom Operator
The boom operator is an assistant to the production sound mixer, responsible for microphone placement and movement during filming. The boom operator uses a boom pole, a long pole made of light aluminum or carbon fiber that allows precise positioning of the microphone above or below the actors, just out of the camera's frame. The boom operator may also place radio microphones and hidden set microphones. In France, the boom operator is called the perchman.
  • Utility Sound Technician
The utility sound technician has a dynamic role in the sound department, most typically pulling cables, but often acting as an additional boom operator or mixer when required by complex filming circumstances. Not all films employ a utility sound technician, but the increasing complexities of location sound recording in modern film have made the job more prevalent. This role is sometimes credited as "cable man" or "python wrangler".


Sound/Music

  • Sound Designer
The sound designer, or "supervising sound editor", is in charge of the post-production sound of a movie. Sometimes this may involve great creative license, and other times it may simply mean working with the director and editor to balance the sound to their liking.
  • Dialogue Editor
Responsible for assembling and editing all the dialog in the soundtrack.
  • Sound Editor
Responsible for assembling and editing all the sound effects in the soundtrack.
  • Re-recording Mixer
Balances all of the sounds prepared by the dialogue, music and effects editors, and finalizes the films audio track.
  • Music Supervisor
The music supervisor, or "music director", works with the composer, mixers and editors to create and integrate the film's music. In Hollywood, a music supervisor's primary responsibility is to act as liaison between the film production and the recording industry, negotiating the use rights for all source music used in a film.
  • Composer
The composer is responsible for writing the musical score for a film.
  • Foley Artist
The foley artist is the person who creates many of the sound effects for a film.

Logic: EXS24 mapping samples by converting to new sampler track


This tutorial shows how take an audio file and keymap it to the sampler by using the function called "converting to new sampler track". This feature is available for Logic 9+ and above


1.Add the audio file to a track and select it.
2.Hold control and click the region
3.In the menu that appears select Convert/Convert to new sampler track


Logic 9 convert to new sampler track menu.png


4.In the dialog box that appears choose your settings

Logic 9 convert regions to new samler track dialog box.png


Create Zones From:
For this option choose Regions if you wish to assign selected regions to keys.Select Transient Markers if you wish to keymap a file by its transients such as a drum loop.
EXS Instrument Name
This will be the name of the patch you are creating.
Trigger Note Range
This is the span of your keymap from the lowest note to the highest note.

5. Click OK when you have the setting you want.

You should now have a new track with the EXS24 inserted on it and a MIDI region reflecting the keymap placement.

Logic: Side chain compression (ducking)

For this tutorial you will need a control signal and an affected signal.
For our side chain example we will use a kick drum (control signal) to trigger a compressor which will dynamically attenuate (or duck) a track with a sustained note (the affected signal).
This means every time the kick drum plays the sustained note will be compressed.

To accomplish this follow these steps:
  1. Create 2 software instrument tracks (You can use audio or instrument tracks for this effect, but for our example we are using instrument tracks)
  2. On the first track insert a software instrument with a drum kit and record a kick drum on every quarter note for 2 bars. After your done, insert Bus 1 into the sends field of the tracks channel strip and turn it up.This will automatically create an aux track with the input as Bus 1, this is unnecessary for what we are trying to do so go to the aux track channel strip and change the input to no input
  3. On the second software instrument track record a sustained note that plays for 2 bars ( you can do this by opening up the ES1 on a software instrument track and using the default patch).
  4. Now on the track you just recorded the sustained note on ,add a compressor plug in to it's respective channel strip. In the side chain field of the compressor click, hold and select Bus 1 as shown in the image below.

Logic 8 Compressor insert.png


  1. Push play on the transport
  2. Turn the compressors ratio all the way up and begin to pull the threshold down. You should hear the sustain note begin to fluctuate in volume in accordance with the kick drum hitting, if not try pulling up the gain on the compressor 


Ducking is an effect commonly used in radio and pop music, especially dance music. It is an effect where the level of one signal is reduced by the presence of another signal, through the use of side chain compression.
A typical application is to automatically lower the level of a musical background track when a voice-over starts, and to automatically bring the level up again when the voice-over stops (in Movies and on radio-broadcasts).
From WikiAudio

Side-chaining uses the signal level of another input or an equalized version of the original input to control the compression level of the original signal. For sidechains that key off of external inputs, when the external signal is stronger, the compressor acts more strongly to reduce output gain. This is used by disc jockeys to lower the music volume automatically when speaking; in this example, the DJ's microphone signal is converted to line level signal and routed to a stereo compressor's sidechain input. The music level is routed through the stereo compressor so that whenever the DJ speaks, the compressor reduces the volume of the music, a process called ducking. The sidechain of a compressor that has EQ controls can be used to reduce the volume of signals that have a strong spectral content within the frequency range of interest. Such a compressor can be used as a de-esser, reducing the level of annoying vocal sibilance in the range of 6-9 kHz. A frequency-specific compressor can be assembled from a standard compressor and an equalizer by feeding a 6-9 kHz-boosted copy of the original signal into the side-chain input of the compressor. A de-esser helps reduce high frequencies that tend to overdrive preemphasized media (such as phonograph records and FM radio). Another use of the side-chain in music production serves to maintain a loud bass track, while still keeping the bass out of the way of the drum when the drum hits.
A stereo compressor without a sidechain can be used as a mono compressor with a sidechain. The key or sidechain signal is sent to the first (main) input of the stereo compressor while the signal that is to be compressed is routed into and out of the second channel of the compressor.
From WikiAudio
http://en.wikiaudio.org/images/1/10/Compressor_Sidechain.png 

Friday, March 18, 2011

Music Theory- Intervals & scales

     An interval is the distance between two notes. Intervals are always counted from the lower note to the higher one, with the lower note being counted as one. Intervals come in different qualities and size. If the notes are sounded successively, it is a melodic interval. If sounded simultaneously, then it is a harmonic interval.      The smallest interval used in Western music is the half step. A visual representation of a half step would be the distance between a consecutive white and black note on the piano. There are two exceptions to this rule, as two natural half steps occur between the notes E and F, and B and C.
     A whole step is the distance between two consecutive white or black keys. It is made up of two half steps.


Keyboard


Qualities and Size
Intervals can be described as Major (M), Minor (m), Perfect (P), Augmented (A), and Diminished (d).
Intervals come in various sizes: Unisons, Seconds, Thirds, Fourths, Fifths, Sixths, and Sevenths.
2nds, 3rds, 6ths, and 7ths can be found as Major and Minor.
Unisons, 4ths, 5ths, and Octaves are Perfect. Listen


Staff
When a major interval is raised by a half step, it becomes augmented.
When a major interval is lowered by a half step, it becomes minor.
When a major interval is lowered by two half steps, it becomes diminished.
When a minor interval is raised by a half step, it becomes major.
When a minor interval is raised by two half steps, it becomes augmented.
When a minor interval is lowered by a half step, it becomes diminished.
When a perfect interval is raised by a half step, it becomes augmented.
When a perfect interval is lowered by a half step, it becomes diminished.
 
INVERSIONS OF INTERVALS
     Intervals can be inverted, which basically means you turn them upside down. The lower note is raised up an octave so that the top note/bottom note relationship is reversed. The chart below shows the inversions of intervals.

Qualities
  • Major becomes Minor
  • Minor becomes Major
  • Perfect remains Perfect
  • Augmented becomes Diminished
  • Diminished becomes Augmented
Size
  • 2 becomes 7
  • 3 becomes 6
  • 4 becomes 5
  • 5 becomes 4
  • 6 becomes 3
  • 7 becomes 2

Interval Identification
     It is important to be able to hear and identify intervals. This is a very important thing for musicians to do. Here is a list of familiar songs that will help you to identify the intervals.
m2- Stormy Weather m2
M2- Happy Birthday M2
m3- The Impossible Dream m3
So Long, Farewell from The Sound of Music
M3- Halls of Montezuma M3
P4- Here comes the bride P4
A4- Maria from West Side Story A4
P5- Star Wars P5
Twinkle, Twinkle, Little Star
M6- NBC theme music M6
m7- Somewhere from West Side Story m7
M7- Bali Hai from South Pacific M7
Octave- Over the rainbow Oct.

Scales

     There are many different types of scales. They are the backbone of music.      A major scale is a series of 8 consecutive notes that use the following pattern of half and whole steps: Listen


W W ½ W W W ½
     Minor Scales come in three forms: Natural, Melodic, and Harmonic.      Natural Minor scales use the following pattern of half and whole steps: Listen


W ½ W W ½ W W
     Melodic Minor scales ascend and use the following pattern of half and whole steps. When descending, they do so in the natural minor form. Listen


W ½ W W W W ½       W ½W W ½ W W
     Harmonic Minor scales use the following pattern of half and whole steps: Listen


W ½ W W ½ W+ ½  ½
     Chromatic Scales are made up entirely of half steps. When ascending, the scale uses sharps, when descending it uses flats.Listen


Chromatic scale
     Whole Tone Scales differ from the other scales because it only has 6 tones. It uses the following pattern: Listen


W W W W W W
     A pentatonic Scale is a five-tone scale, which has its beginning in antiquity. There are traces of this scale in Oriental and American Indian music. This scale does not have a leading tone, which gives the scale it's unique sound. The scale has two forms. The first one uses the group of two black keys followed by three black keys. The pattern is as follows: Listen


W W+ ½ W W
      The second one used the group of three black keys followed by two black keys. The pattern is as follows: Listen


W W W+½ W


Key Signatures
      There are 15 major and 15 minor key signatures. The sharps or flats at the beginning of the staff indicate the main tone (diatonic) to which other tones are related.


Circle of 5ths


Db-C#, Gb-F#, Cb-B, are enharmonic keys, meaning that they are written differently, but sound the same. There are 15 major and 15 minor key signatures. The sharps or flats at the beginning of the staff indicate the main tone (diatonic) to which other tones are related.


Key Signatures


Relative Minor

Music Theory - Chords & Symbols

Triad     A triad is a group of three notes having a specific construction and relationship to one another. They are constructed on 3 consecutive lines or three consecutive spaces. Each member of the triad is separated by an interval of a third. The triad is composed of a Root, Third, and Fifth.

Triad
     There are four types of triads: major, minor, diminished and augmented.

MajorMinorDiminishedAugmented
Inversions of Triads
     All triads have three positions that they can be arranged in. The root, 1st inversion, and 2nd inversion.
Root Position Triad
     If the triad root is in the lowest voice then the triad is in Root Position.

Root
1st Inversion Triad
     If the third of the triad is in the lowest voice the triad is the 1st inversion.

1st Inversion
2nd Inversion Triad
     If the 5th of the triad is in the lowest voice, the triad is in the 2nd inversion.

2nd Inversion
Figured Bass
     Figured Bass was developed in the early Baroque period. It was a system of musical shorthand that made the writing of keyboard parts easier. It was customary for the composer to write out the bass line and to place Arabic numerals above or below the figured bass to indicate the harmonies. The keyboard part was called the continuo, which was improvised by the player.
     In figured bass the Arabic numerals represent the intervals that sound above a given bass part. Certain abbreviations have become well known.

Figured Bass
Figured Bass 2
Figured Bass 3
Alterations
     Alterations from the given key signature are indicated by placing an accidental before the Arabic numeral.
     An accidental, such as a sharp, flat, or natural that appears by itself under a bass note indicates a triad in root position with the third interval above the bass note sharped, flatted or naturaled.
Any sharp, flat, or natural sign beside the Arabic number indicates that this interval above the bass note should be sharped, flatted, or naturaled depending on the symbol.
#6,   b6,   6,    #6
  4                   b4

Sometimes, composers used a slash through the Arabic number instead of a sharp. They both mean the same thing.

     Roman Numeral Analysis
     In the early 1800's, German composers started to use roman numerals to symbolize harmony. Each note in a scale can have a triad or chord built above it. Upper case (Major) and lower case (minor) Roman Numerals are used to indicate the type of chord. I, IV, V are major triads/chords, ii, iii, vi are minor triads/chords, and vii is diminished.

Staff with Numerals

Mixed in Key ( improve your DJ Sets)

Mixed In Key
Improve Your DJ Sets

Mixed In Key is award-winning DJ software that gives you the #1 technique of the world's best DJ's - harmonic mixing. 
What is Harmonic Mixing? It's mixing one track with the next without a key clash.  By mixing tracks of the same or related musical keys, you can create perfect mash-ups and live DJ sets.  With Mixed In Key, you simply load up your MP3 and WAV files and the software scans the tracks, and extracts the key and BPM information.
It shows you a list of compatible tracks for flawless mixing.  Are you ready to mix like Pete Tong, David Guetta, Dubfire, Paul Oakenfold and many more
http://www.mixedinkey.com