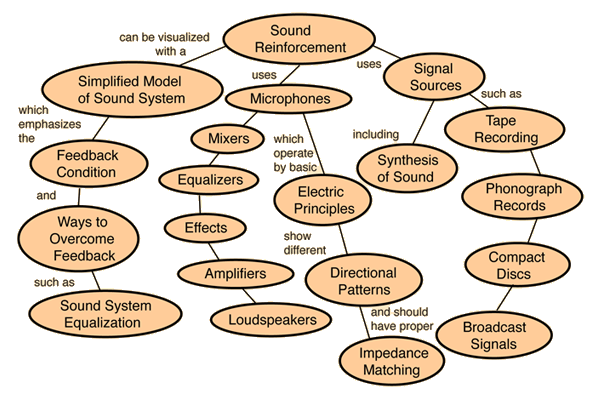
Thursday, April 14, 2011
Methods of Synthesis
- additive synthesis - combining tones, typically harmonics of varying amplitudes
- subtractive synthesis - filtering of complex sounds to shape harmonic spectrum, typically starting with geometric waves.
- frequency modulation synthesis - modulating a carrier wave with one or more operators
- sampling - using recorded sounds as sound sources subject to modification
- composite synthesis - using artificial and sampled sounds to establish resultant "new" sound
- phase distortion - altering speed of waveforms stored in wavetables during playback
- waveshaping - intentional distortion of a signal to produce a modified result
- resynthesis - modification of digitally sampled sounds before playback
- granular synthesis - combining of several small sound segments into a new sound
- linear predictive coding - technique for speech synthesis
- direct digital synthesis - computer modification of generated waveforms
- wave sequencing - linear combinations of severtal small segments to create a new sound
- vector synthesis - technique for fading between any number of different sound sources
- physical modeling - mathematical equations of acoustic characteristics of sound
Sunday, April 10, 2011
Saturday, April 9, 2011
why should we measure sound?
To know more about something we need to measure them, this not only enables us to understand a particular criterion better but also helps us to device methodologies enabling us to control the same. The same applies to sound.
The measurement of sound will help us to precisely and scientifically control the unwanted sounds. Moreover the intensity of sound tends to play a very important role in ones hearing capability. Exposure to high levels of sound can cause damage to the ears and its sensitivity to hear. This is done separately in a field of study known as audiometry.
The various methods by which we measure sound are as follows:
- Sound Pressure Level
- Sound Intensity Level
- Sound Power Level
- Frequency Spectrum
- Frequency response function.
Friday, April 8, 2011
Sound Wave Properties
| Wavelength: The distance between any point on a wave and the equivalent point on the next phase. Literally, the length of the wave. | 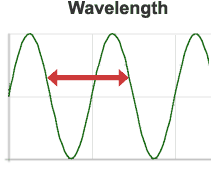 |
| Amplitude: The strength or power of a wave signal. The "height" of a wave when viewed as a graph. Higher amplitudes are interpreted as a higher volume, hence the name "amplifier" for a device which increases amplitude. | 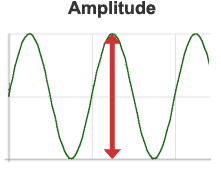 |
| Frequency: The number of times the wavelength occurs in one second. Measured in kilohertz (Khz), or cycles per second. The faster the sound source vibrates, the higher the frequency. Higher frequencies are interpreted as a higher pitch. For example, when you sing in a high-pitched voice you are forcing your vocal chords to vibrate quickly. | 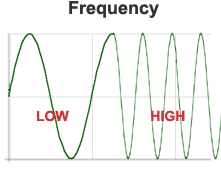 |
Vocal range and voice classification
- Soprano: C4 – C6
- Mezzo-soprano: A3 – A5
- Contralto: F3 – F5
- Tenor: C3 – C5
- Baritone: F2 – F4
- Bass: E2 – E4
Frequency Range of Vocals and Musical Instruments
Frequencies for equal-tempered scale
This table created using A4 = 440 Hz
Speed of sound = 345 m/s = 1130 ft/s = 770 miles/hr
("Middle C" is C4 )
(To convert lengths in cm to inches, divide by 2.54)
Speed of sound = 345 m/s = 1130 ft/s = 770 miles/hr
("Middle C" is C4 )
| Note | Frequency (Hz) | Wavelength (cm) |
|---|---|---|
| C0 | 16.35 | 2100. |
| C#0/Db0 | 17.32 | 1990. |
| D0 | 18.35 | 1870. |
| D#0/Eb0 | 19.45 | 1770. |
| E0 | 20.60 | 1670. |
| F0 | 21.83 | 1580. |
| F#0/Gb0 | 23.12 | 1490. |
| G0 | 24.50 | 1400. |
| G#0/Ab0 | 25.96 | 1320. |
| A0 | 27.50 | 1250. |
| A#0/Bb0 | 29.14 | 1180. |
| B0 | 30.87 | 1110. |
| C1 | 32.70 | 1050. |
| C#1/Db1 | 34.65 | 996. |
| D1 | 36.71 | 940. |
| D#1/Eb1 | 38.89 | 887. |
| E1 | 41.20 | 837. |
| F1 | 43.65 | 790. |
| F#1/Gb1 | 46.25 | 746. |
| G1 | 49.00 | 704. |
| G#1/Ab1 | 51.91 | 665. |
| A1 | 55.00 | 627. |
| A#1/Bb1 | 58.27 | 592. |
| B1 | 61.74 | 559. |
| C2 | 65.41 | 527. |
| C#2/Db2 | 69.30 | 498. |
| D2 | 73.42 | 470. |
| D#2/Eb2 | 77.78 | 444. |
| E2 | 82.41 | 419. |
| F2 | 87.31 | 395. |
| F#2/Gb2 | 92.50 | 373. |
| G2 | 98.00 | 352. |
| G#2/Ab2 | 103.83 | 332. |
| A2 | 110.00 | 314. |
| A#2/Bb2 | 116.54 | 296. |
| B2 | 123.47 | 279. |
| C3 | 130.81 | 264. |
| C#3/Db3 | 138.59 | 249. |
| D3 | 146.83 | 235. |
| D#3/Eb3 | 155.56 | 222. |
| E3 | 164.81 | 209. |
| F3 | 174.61 | 198. |
| F#3/Gb3 | 185.00 | 186. |
| G3 | 196.00 | 176. |
| G#3/Ab3 | 207.65 | 166. |
| A3 | 220.00 | 157. |
| A#3/Bb3 | 233.08 | 148. |
| B3 | 246.94 | 140. |
| C4 | 261.63 | 132. |
| C#4/Db4 | 277.18 | 124. |
| D4 | 293.66 | 117. |
| D#4/Eb4 | 311.13 | 111. |
| E4 | 329.63 | 105. |
| F4 | 349.23 | 98.8 |
| F#4/Gb4 | 369.99 | 93.2 |
| G4 | 392.00 | 88.0 |
| G#4/Ab4 | 415.30 | 83.1 |
| A4 | 440.00 | 78.4 |
| A#4/Bb4 | 466.16 | 74.0 |
| B4 | 493.88 | 69.9 |
| C5 | 523.25 | 65.9 |
| C#5/Db5 | 554.37 | 62.2 |
| D5 | 587.33 | 58.7 |
| D#5/Eb5 | 622.25 | 55.4 |
| E5 | 659.26 | 52.3 |
| F5 | 698.46 | 49.4 |
| F#5/Gb5 | 739.99 | 46.6 |
| G5 | 783.99 | 44.0 |
| G#5/Ab5 | 830.61 | 41.5 |
| A5 | 880.00 | 39.2 |
| A#5/Bb5 | 932.33 | 37.0 |
| B5 | 987.77 | 34.9 |
| C6 | 1046.50 | 33.0 |
| C#6/Db6 | 1108.73 | 31.1 |
| D6 | 1174.66 | 29.4 |
| D#6/Eb6 | 1244.51 | 27.7 |
| E6 | 1318.51 | 26.2 |
| F6 | 1396.91 | 24.7 |
| F#6/Gb6 | 1479.98 | 23.3 |
| G6 | 1567.98 | 22.0 |
| G#6/Ab6 | 1661.22 | 20.8 |
| A6 | 1760.00 | 19.6 |
| A#6/Bb6 | 1864.66 | 18.5 |
| B6 | 1975.53 | 17.5 |
| C7 | 2093.00 | 16.5 |
| C#7/Db7 | 2217.46 | 15.6 |
| D7 | 2349.32 | 14.7 |
| D#7/Eb7 | 2489.02 | 13.9 |
| E7 | 2637.02 | 13.1 |
| F7 | 2793.83 | 12.3 |
| F#7/Gb7 | 2959.96 | 11.7 |
| G7 | 3135.96 | 11.0 |
| G#7/Ab7 | 3322.44 | 10.4 |
| A7 | 3520.00 | 9.8 |
| A#7/Bb7 | 3729.31 | 9.3 |
| B7 | 3951.07 | 8.7 |
| C8 | 4186.01 | 8.2 |
| C#8/Db8 | 4434.92 | 7.8 |
| D8 | 4698.64 | 7.3 |
| D#8/Eb8 | 4978.03 | 6.9 |
(To convert lengths in cm to inches, divide by 2.54)
Monday, April 4, 2011
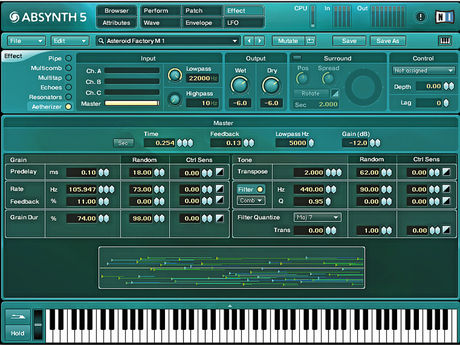
Native Instruments Absynth 5
Ever since its debut in 2002, Absynth has been lauded as one of the most versatile and powerful soft synths on the market. Native Instruments' semi-modular beast is truly feature-packed, boasting oscillators into which you can draw your own waveforms, definable multipoint envelopes, deep modulation capabilities, and some of the most 'out there' sounds you're ever likely to hear.
The LFOs, vast array of filter types and assignable performance controls are worth a mention, too, while a quick flick through the generous preset library reveals scorching leads, mind-boggling hybrid instruments and evolving pads that almost seem to be alive. A sound designer's dream,
Parallel Multiband Compression for Mastering in Logic Pro
How to setup Logic pro
Follow the instructions to the letter and things will work perfectly.
First you need to make sure full plug-in delay compensation is enabled in Logic Pro. If you don't do this you could get phase problems.
Logic Pro > Preferences > Audio>General > Plug-in Delay > Compensation > All
You need:
1 audio track
1 aux channel
1 main output (entitled Output 1-2)
Take a look at the screenshot for reference.

How to do it
Place the stereo mix file you are about to master on the audio track.
Open a send from the audio channel to Bus 1, and send unity value (0.0 dB). The shortcut for this is Option+clicking on the send knob.
This automatically creates a Aux 1 channel with Bus 1 as input, if it isn't already created in your setup.
Now apply whatever mastering plug-ins you need such as equalizer and single band compression to your audio track, not the Aux. However, do not apply a limiter to the audio track and do not touch the volume fader on this track unless you first set send mode to pre-send instead of the default post-send.
If you wish to use a limiter plug-in it should be inserted on Output 1-2 as this is where the processed signal and the parallel signal will meet up, and they need to be processed together.
Open the Logic Multipressor (or a Waves Phase Linear Multiband compressor, though Logic's will do just fine) on Aux 1 and load this preset:
http://www.popmusic.dk/download/logic/parallel-multiband/multipressor.zip
Place the downloaded preset here:
HD > Users > YourUserName > Library > Application Support > Logic > Plug-In Settings > Multipressor
Settings
Threshold: -48 dBFS or lower
During this type of compression you need constant gain reduction and you want the compressor to react to very low passages.
Ratio: 2:1
The ratio should be fairly low although you can certainly experiment with this parameter for more radical effects.
Peak/RMS: 0 ms
Part of this trick is to violently smack down on transients so you need the compressor to react to peaks.
Attack: 0 ms
Same as above.
Release: 300 ms or above
Too short and things will start to pump a bit which isn't what you normally want. So use release times between 300 and up to a few seconds even.
Shorter release times = more obvious compression but also more effect (especially in the high frequencies)
Longer relaease times = less obvious compression but also less effect
You can set individual release times per band, i.e. longer release times for the sub frequencies and very high frequencies. High frequencies jumping around isn't as much an issue with the Logic Multipressor but more an issue with 5 band compressors like the Waves Linear Phase Multiband where the ultra high frequencies have their own band (11 kHz+).
Gain Make-up per band
As a starting point you don't need to touch the individual make-up gains. But if you feel the parallel signal needs to contribute more to a special frequency area this is the place to do it. As you're raising a heavily compressed signal in a specific band it sounds very different to equalizing and is a great alternative solution.
Other functions
Do not use autogain or touch the expander. Lookahead isn't necessary for this trick so you can set it for 0 ms (you need to start/stop the song to reset the delay compensation caused by the lookahead if you touch it during playback).
Amount of parallel signal
Use the Aux 1 volume fader to choose the amount of parallel multiband compressed signal you want to add to the blend. A normal setting would be about 15-25% of the original signal but always use your ears.
How to do fades or change the volume
As mentioned earlier: do not touch the volume fader on the audio track as this will affect the input dynamics of the parallel signal. If you for some reason want to adjust this channel then set send mode to pre-send first.
If you wish to do a fade in or out on your master, then do this by automating the volume parameter on the Output 1-2 fader which contains both the original processed signal and the parallel signal.
What is parallel compression
Parallel compression is often used during mixing to fatten up tracks, especially drums. It can also be used on vocals to increase fullness and bring up details without the pumping artifacts of regular (downward) compression.
Parallel compression is also used during mastering since it - unlike regular compression - can raise low level passages while still retaining more of the original dynamics during loud passages. Just as in mixing parallel compression can help fatten up a master and bring up "buried" details.
Parallel compression is not a substitute for normal downward compression but something to use in addition to add fullness and details.
Search the internet for more information about what parallel compression is and how it works in details.
Parallel Multiband Compression
Parallel multiband compression applies the exact same principles as its single band cousin. However, it sounds a bit different due to the separate bands. Parallel multiband compression also acts a bit like an intelligent loudness enhancer because of the psychoacoustics in how the human brain interprets especially the low and high frequency bands in relation to loudness perception. This trick is not possible in the same way with single band parallel compression, even when used in combination with an equalizer.
Follow the instructions to the letter and things will work perfectly.
First you need to make sure full plug-in delay compensation is enabled in Logic Pro. If you don't do this you could get phase problems.
Logic Pro > Preferences > Audio>General > Plug-in Delay > Compensation > All
You need:
1 audio track
1 aux channel
1 main output (entitled Output 1-2)
Take a look at the screenshot for reference.

How to do it
Place the stereo mix file you are about to master on the audio track.
Open a send from the audio channel to Bus 1, and send unity value (0.0 dB). The shortcut for this is Option+clicking on the send knob.
This automatically creates a Aux 1 channel with Bus 1 as input, if it isn't already created in your setup.
Now apply whatever mastering plug-ins you need such as equalizer and single band compression to your audio track, not the Aux. However, do not apply a limiter to the audio track and do not touch the volume fader on this track unless you first set send mode to pre-send instead of the default post-send.
If you wish to use a limiter plug-in it should be inserted on Output 1-2 as this is where the processed signal and the parallel signal will meet up, and they need to be processed together.
Open the Logic Multipressor (or a Waves Phase Linear Multiband compressor, though Logic's will do just fine) on Aux 1 and load this preset:
http://www.popmusic.dk/download/logic/parallel-multiband/multipressor.zip
Place the downloaded preset here:
HD > Users > YourUserName > Library > Application Support > Logic > Plug-In Settings > Multipressor
Settings
Threshold: -48 dBFS or lower
During this type of compression you need constant gain reduction and you want the compressor to react to very low passages.
Ratio: 2:1
The ratio should be fairly low although you can certainly experiment with this parameter for more radical effects.
Peak/RMS: 0 ms
Part of this trick is to violently smack down on transients so you need the compressor to react to peaks.
Attack: 0 ms
Same as above.
Release: 300 ms or above
Too short and things will start to pump a bit which isn't what you normally want. So use release times between 300 and up to a few seconds even.
Shorter release times = more obvious compression but also more effect (especially in the high frequencies)
Longer relaease times = less obvious compression but also less effect
You can set individual release times per band, i.e. longer release times for the sub frequencies and very high frequencies. High frequencies jumping around isn't as much an issue with the Logic Multipressor but more an issue with 5 band compressors like the Waves Linear Phase Multiband where the ultra high frequencies have their own band (11 kHz+).
Gain Make-up per band
As a starting point you don't need to touch the individual make-up gains. But if you feel the parallel signal needs to contribute more to a special frequency area this is the place to do it. As you're raising a heavily compressed signal in a specific band it sounds very different to equalizing and is a great alternative solution.
Other functions
Do not use autogain or touch the expander. Lookahead isn't necessary for this trick so you can set it for 0 ms (you need to start/stop the song to reset the delay compensation caused by the lookahead if you touch it during playback).
Amount of parallel signal
Use the Aux 1 volume fader to choose the amount of parallel multiband compressed signal you want to add to the blend. A normal setting would be about 15-25% of the original signal but always use your ears.
How to do fades or change the volume
As mentioned earlier: do not touch the volume fader on the audio track as this will affect the input dynamics of the parallel signal. If you for some reason want to adjust this channel then set send mode to pre-send first.
If you wish to do a fade in or out on your master, then do this by automating the volume parameter on the Output 1-2 fader which contains both the original processed signal and the parallel signal.
What is parallel compression
Parallel compression is often used during mixing to fatten up tracks, especially drums. It can also be used on vocals to increase fullness and bring up details without the pumping artifacts of regular (downward) compression.
Parallel compression is also used during mastering since it - unlike regular compression - can raise low level passages while still retaining more of the original dynamics during loud passages. Just as in mixing parallel compression can help fatten up a master and bring up "buried" details.
Parallel compression is not a substitute for normal downward compression but something to use in addition to add fullness and details.
Search the internet for more information about what parallel compression is and how it works in details.
Parallel Multiband Compression
Parallel multiband compression applies the exact same principles as its single band cousin. However, it sounds a bit different due to the separate bands. Parallel multiband compression also acts a bit like an intelligent loudness enhancer because of the psychoacoustics in how the human brain interprets especially the low and high frequency bands in relation to loudness perception. This trick is not possible in the same way with single band parallel compression, even when used in combination with an equalizer.
Microphone Frequency Response
Frequency Response Charts
A microphone's frequency response pattern is shown using a chart like the one below and referred to as a frequency response curve. The x axis shows frequency in Hertz, the y axis shows response in decibels. A higher value means that frequency will be exaggerated, a lower value means the frequency is attenuated. In this example, frequencies around 5 - kHz are boosted while frequencies above 10kHz and below 100Hz are attenuated. This is a typical response curve for a vocal microphone.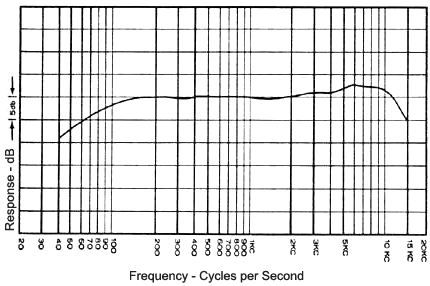
Which Response Curve is Best?
An ideal "flat" frequency response means that the microphone is equally sensitive to all frequencies. In this case, no frequencies would be exaggerated or reduced (the chart above would show a flat line), resulting in a more accurate representation of the original sound. We therefore say that a flat frequency response produces the purest audio.In the real world a perfectly flat response is not possible and even the best "flat response" microphones have some deviation.
More importantly, it should be noted that a flat frequency response is not always the most desirable option. In many cases a tailored frequency response is more useful. For example, a response pattern designed to emphasise the frequencies in a human voice would be well suited to picking up speech in an environment with lots of low-frequency background noise.
The main thing is to avoid response patterns which emphasise the wrong frequencies. For example, a vocal mic is a poor choice for picking up the low frequencies of a bass drum.
Frequency Response Ranges
You will often see frequency response quoted as a range between two figures. This is a simple (or perhaps "simplistic") way to see which frequencies a microphone is capable of capturing effectively. For example, a microphone which is said to have a frequency response of 20 Hz to 20 kHz can reproduce all frequencies within this range. Frequencies outside this range will be reproduced to a much lesser extent or not at all.This specification makes no mention of the response curve, or how successfully the various frequencies will be reproduced. Like many specifications, it should be taken as a guide only.
Condenser vs Dynamic
Condenser microphones generally have flatter frequency responses than dynamic. All other things being equal, this would usually mean that a condenser is more desirable if accurate sound is a prime consideration.Sunday, April 3, 2011
Microphone Impedance
If you want the short answer, here it is: Low impedance is better than high impedance.
If you're interested in understanding more, read on....
What is Impedance?
Impedance is an electronics term which measures the amount of opposition a device has to an AC current (such as an audio signal). Technically speaking, it is the combined effect of capacitance, inductance, and resistance on a signal. The letter Z is often used as shorthand for the word impedance, e.g. Hi-Z or Low-Z.Impedance is measured in ohms, shown with the Greek Omega symbol Ω. A microphone with the specification 600Ω has an impedance of 600 ohms.
What is Microphone Impedance?
All microphones have a specification referring to their impedance. This spec may be written on the mic itself (perhaps alongside the directional pattern), or you may need to consult the manual or manufacturer's website.You will often find that mics with a hard-wired cable and 1/4" jack are high impedance, and mics with separate balanced audio cable and XLR connector are low impedance.
There are three general classifications for microphone impedance. Different manufacturers use slightly different guidelines but the classifications are roughly:
- Low Impedance (less than 600Ω)
- Medium Impedance (600Ω - 10,000Ω)
- High Impedance (greater than 10,000Ω)
Which Impedance to Choose?
High impedance microphones are usually quite cheap. Their main disadvantage is that they do not perform well over long distance cables - after about 5 or 10 metres they begin producing poor quality audio (in particular a loss of high frequencies). In any case these mics are not a good choice for serious work. In fact, although not completely reliable, one of the clues to a microphone's overall quality is the impedance rating.Low impedance microphones are usually the preferred choice.
Matching Impedance with Other Equipment
Microphones aren't the only things with impedance. Other equipment, such as the input of a sound mixer, also has an ohms rating. Again, you may need to consult the appropriate manual or website to find these values. Be aware that what one system calls "low impedance" may not be the same as your low impedance microphone - you really need to see the ohms value to know exactly what you're dealing with.A low impedance microphone should generally be connected to an input with the same or higher impedance. If a microphone is connected to an input with lower impedance, there will be a loss of signal strength.
In some cases you can use a line matching transformer, which will convert a signal to a different impedance for matching to other components.
Saturday, April 2, 2011
How to Quantize Audio in Pro Tools Using Beat Detective and Elastic Audio
Step 1
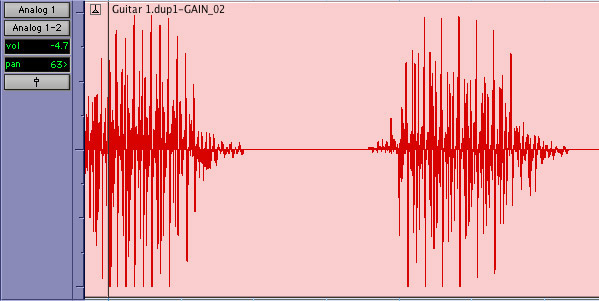
To become comfortable with the beat correcting process, it is best to a start off with a guitar track because it has many large transients and peaks within the waveform. If you cannot play guitar or do not have any guitar tracks available, bass and vocal tracks will also work fine. Drums are great too, assuming they are on multiple tracks.It will also help a good amount if your track has breaks or rests similar to the screenshot below. Start off creating a session as normal, and set up either a click track or a drum machine plug in. It is important to play along with this steady rhythm so that you will hear the effect of beat detecting during playback. Lastly, make sure that the “Tab to Transients” and “Keyboard Focus” buttons are checked. These two functions will be helpful throughout the process.

Step 2
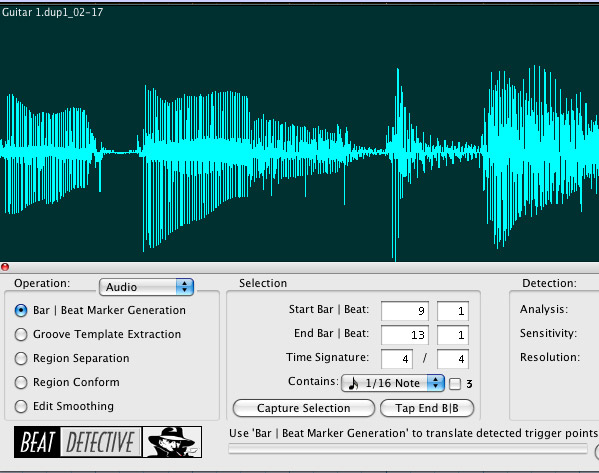
First, we will quantize using beat detective, which is a bit more complex than elastic time. Once you have an audio track ready to be quantized, make sure the timeline is set to “Grid” mode and use the hand or selection tool to pick a part of the region you want to beat detect.After you have the region selected, press the “E” key on your keyboard to get a zoomed in view of the waveform. You will need to closely watch the timeline marker and beat markers on the transients while beat detecting. Now go to “Event > Beat Detective” in the menu bar.
Step 3
Now we have to create the beat markers so beat detective knows where audio should be on the grid. In the first section of beat detective, check to make sure that the start and end beat matches the area of the region you selected. If it does not you will have to click the “Capture Selection” button or type in the numbers manually.In the drop down list labeled “Contains,” select the quickest note value that occurs in the region you are quantizing. If there is even one note shorter than the “Contains” settings specify, the beat markers will not pick it up.
Step 4
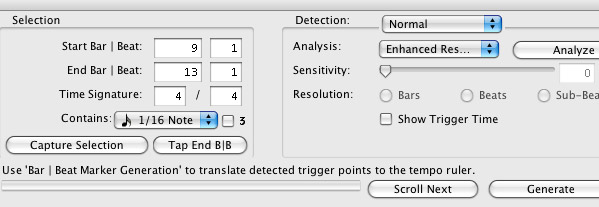
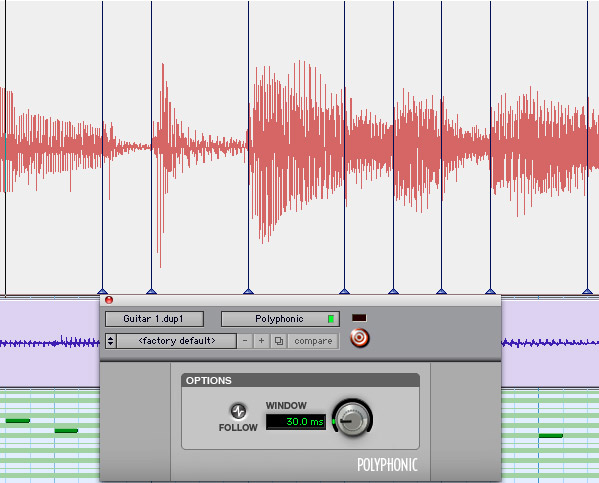
At the end of the window you will see two drop down menus. Depending on what version of Pro Tools you have (M Powered, LE, or HD) you may or may not see the first drop down labeled “Normal” in the screenshot below. The first menu should be left at “Normal” if it exists, and make sure the second menu has “Enhanced Resolution” selected.Now click “Analyze” and drag the sensitivity slider until you see beat markers placed against all of the notes in the waveform. Check that “Resolution” is set to Sub-Beats. If beat detective makes extra markers in the waveform these can be deleted. You can edit the beat markers by using the hand tool. Double clicking will create a new beat marker, and Option (Alt on a PC) clicking a beat marker will delete it. Also, by clicking and dragging you can move a beat marker, if you feel it is in the wrong place.
Getting the markers right is the most time consuming part of beat detective. Critical listening is required in order to make sure markers are in the right locations. It is sometimes helpful to play the track back at half speed to hear and to see when the timeline hits a spot in the waveform. Half speed playback can be accomplished by holding shift and pressing the spacebar.
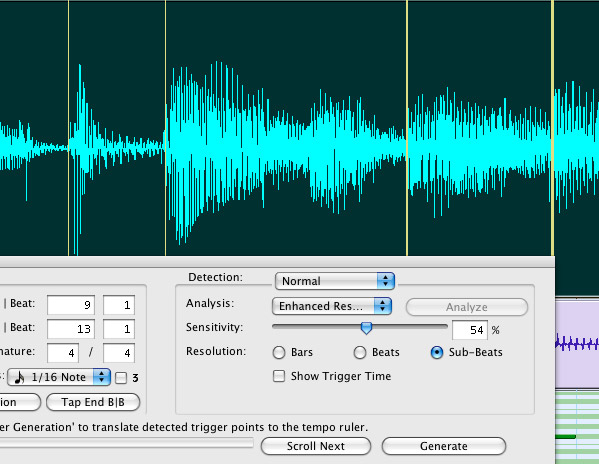
Step 5
The next section on the left of the beat detective window called Groove Template Extraction is mainly for extracting a groove from an audio track and applying it to midi data. We do not need this for quantizing, so let’s skip to the section after that called Region Separation. All you need to do here is click the button labeled “Separate” at the bottom right hand corner.This will spilt the region into many parts based on where the beat markers exist. Now go to the next section called Region Conform. To hear the full effect of the quantization check off “Strength” and drag the slider to 100%. “Exclude Within” and “Swing” should be left unchecked, but these settings can be adjusted later in order to get the feel you want.
After this, click “Conform” in the bottom right and you should see the regions move slightly. If they move too far you may want to go back and check your beat markers.
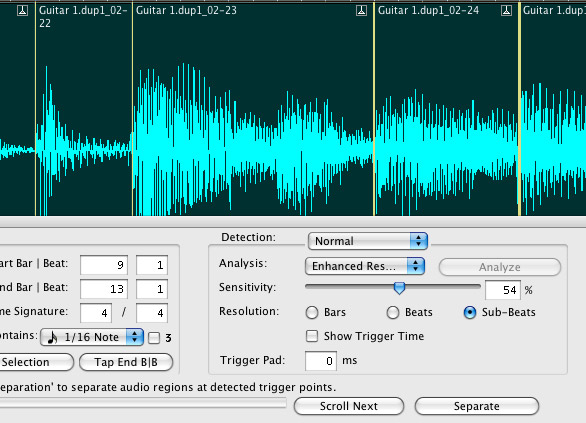
Step 6
The audio track has now been quantized, but we aren’t done yet. We have to make sure that there are no region gaps (unwanted silent spaces), clicks, or pops in the audio. To prevent these things from happening, go to the last section called Edit Smoothing. In this section there are only two options, Fill Gaps or Fill and Crossfade.Fill and Crossfade yields the best results for clean audio so select that and leave the Crossfade Length at the default 5ms. After you have it selected, simply click the “Smooth” button at the bottom right. Now it’s time to listen to your fully quantized track!
If everything was done right, the track should have a very tight and possibly, ‘almost too perfect’ sound. Remember that if any part sounds off, just hit undo a few times to get back to before the regions were separated. Then you will be able to edit the beat markers again. Repeat these steps on as many tracks as you wish to correct. Use “Tab to Transients” to assist in selecting within a region, and remember to hit the E key to zoom in on your selection.
Once you go through this process a few times it becomes a very simple and relatively quick way of quantizing audio. Go on to Step 7 to learn a much easier way of quantizing!
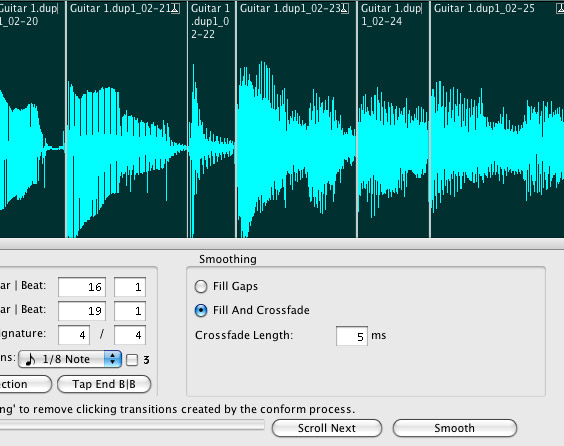
Step 7
With Pro Tools version 7.4 it is possible to quantize tracks using elastic audio. Elastic audio will generate markers for you without any work. To enable elastic audio click the arrow button at the bottom of the track and select Polyphonic in the list (bottom arrow shown in screenshot). Wait a couple seconds for the warp markers to generate and then click the waveform button and switch it to warp view (top arrow in screenshot).
Step 8
Here comes the cool part. Use the hand tool to select a region in the warped track and go to Event > Event Operations > Quantize. The window that you see below will appear. Set the quantize grid to the note value you need and leave all the other settings alone. Click apply and just like that your track has been quantized!Ironically elastic audio seems to have a better algorithm for automatically detecting beats. So why not use elastic audio all the time? Well, for one reason: having many warped tracks can eat up cpu cycles, though minimal in comparison to heavy plug-ins. Also, there are some tracks where elastic audio will not be accurate, and it becomes necessary to use beat detective in order to make sure tracks quantize the way you want.
More often than not though, elastic audio is a great way to quickly quantize your audio tracks.
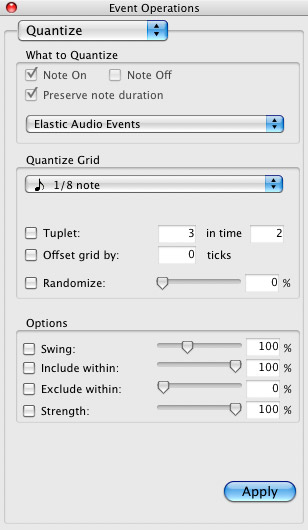
Step 9
You have now fully quantized your track using elastic audio, but if something does not sound right you will need to know how to edit warp markers. Editing warp markers is very similar to editing beat markers in beat detective.Use the hand tool to click and drag a marker into a new position, and option (alt on a PC) click a marker to delete it. A marker can be unlocked by double clicking with the hand tool. A new marker can be created with a click from the pencil tool. Experiment with these different options to create the effect you are looking for. Now you have learned how to quantize audio using both beat detective and elastic audio. No more recording dozens of takes until you get it right. Have fun quantizing!
Create a Vocal Glitch Sequence ( logic pro)
Step 1
Select and import the vocal phrase or performance you would like to manipulate and make sure it’s on its own dedicated track. As far as choosing the right sort of vocal to process, it really helps if you can get the original to a point where it’s in time with the rest of your production. You can do this by using time-stretching or propellerheads recycle (if it’s a rhythmical phrase). Of course, it also helps if it’s in tune, but again, if needed you can manipulate the audio until it fits.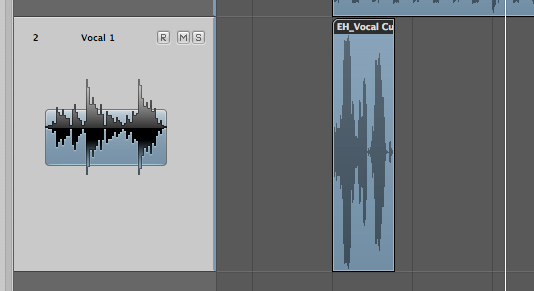
Step 2
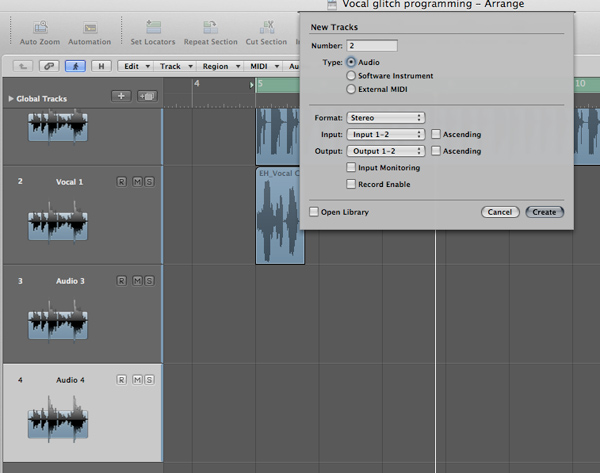
At this point, create a few new audio tracks. These tracks will accommodate the new edits of your vocal sample so it’s a really good idea to make them the same format as the original track i.e. stereo or mono.The amount of tracks you make here isn’t critical, just try to estimate how many you will use. If in doubt create a good number, they can always be deleted at a later stage.
Step 3
Now cut the vocal up into its component parts. This is easily achieved by visually scanning the part and cutting at every hard transient or dynamic event. Audition each part to make sure the sounds are clearly divided.This is a critical part of constructing your glitch sequence, so take your time here, it will pay off later.

Step 4
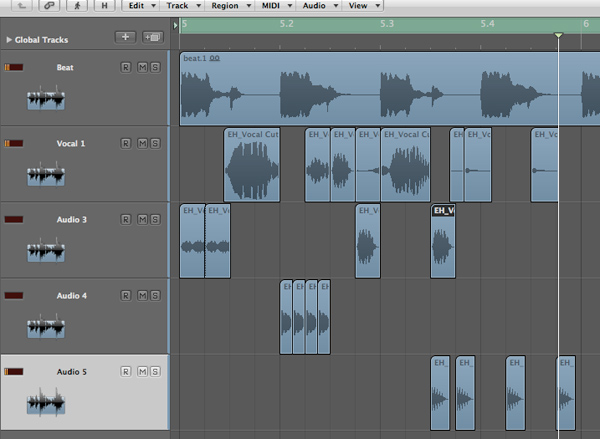
Start to place these new sections of audio onto the new tracks you have created. Initially pick out the stronger sounds with plenty of attack and impact. This is really a process of trial and error, so don’t be afraid to undo what you have done and start again.As you are placing the initial parts you can start to build up the early stages of your sequence. You can do this by repeating some of the parts and moving others into new positions.
Step 5
As the pattern develops cut smaller sections from some of the audio slices and loop them for small amounts of time. This creates the classic glitch/stutter effect you may have heard in other electronic productions. The smaller the section you cut and repeat the more intense the effect will become. Try experimenting with lots of different lengths and repetitions.This works better with some parts than others and you’ll find that brighter sounds with more high end content and faster attack signatures will produce a better result.

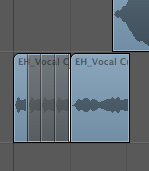
Step 6
Now start to build up a groove using larger parts of the vocal. Place these slices into gaps in the sequence and try replacing other parts with them as well. This will essentially twist the original order of the vocal part and make it sound synthetic.You should also hear a new groove developing at this point, go with it and start to develop any ideas you have as you go. This will make the patter more original and compliment your music.
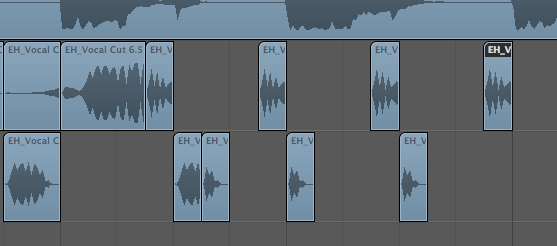
Step 7
Zoom out and take a look at your overall pattern and see it as a whole. This is often a great way of spotting gaps or areas that could use work. Put any finishing touches to the sequence and make sure you are happy with your groove.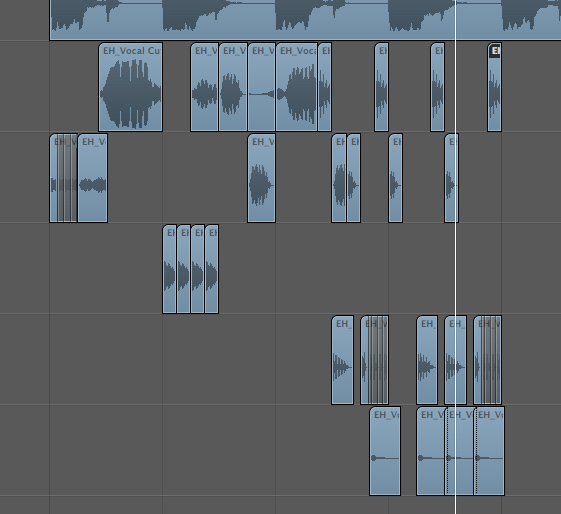
Step 8
A good tactic here can be to try developing a completely new pattern from the vocal parts, in no way based on the original vocal. This can be used as an alternative pattern or as a fill in your sequence. Do this in an empty area of your arrange window–this way you’ll be uninfluenced by the previous pattern.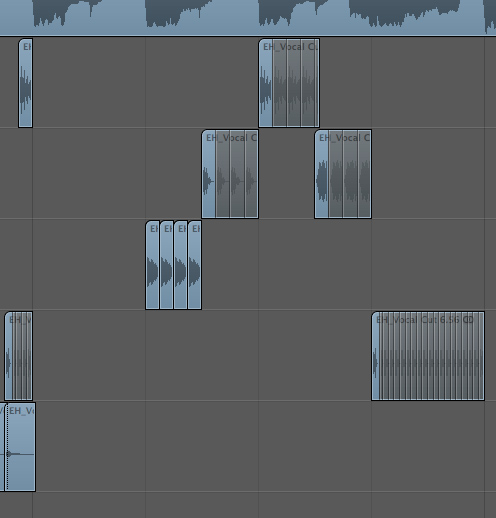
Step 9
It’s now time to think about how these new clips and sections are mixed together. Open the mixer in your DAW and start to strike a good balance between the parts. Also make sure they are mixed well with any beats or synths you may already have programmed and try to avoid clipping if possible.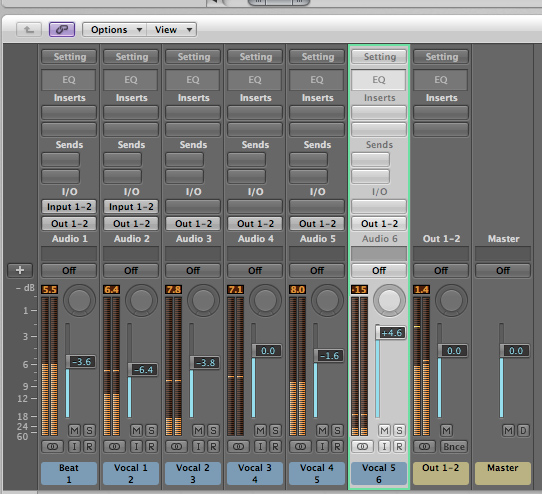
Step 10
Try adding effects and processing to different parts of the sequence. You could add some distortion or saturation to one part and delay to another, creating real texture and contrast.Filter any problem frequencies from the parts and use dynamics processors to control wayward dynamics.
Think about your stereo field at this point. Try to spread the different sections apart from each other. This will create a wider, more involving sound. You can also try automating some of the pan and level settings for extra movement.
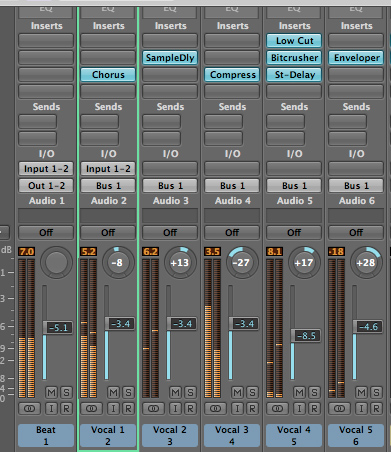
Step 11
Finally route all of your vocal channels to a group for further processing and control. Some light limiting or compression and a filter to remove any very low frequencies may suffice here but you can always add an automated filter or some extra eq if needed. Your glitch sequence should now be ready to use in your arrangement.If you need to save CPU headroom you can always export the sequence for use as one audio file.

Subscribe to:
Posts (Atom)

