Sunday, November 20, 2011

How to Get The Most Out of Your Drum Loops


Step 1: Cut Them Up

The first step to spicing up your drum loops is to cut them open. How detailed you want to do this is up to you, but each beat is a good starting point. For example, in the extremely simple loop below, I’ve used Logic’s scissor tool to cut each beat into a separate region. Any DAW has a scissor or a cut tool so this is easy enough to do.
Since I’m using Logic’s loops, it’s easy to cut in grid mode, but if you don’t know the tempo of your loop and can’t make it snap to the grid then you need to be more careful with your cuts.
As you can see above, I’ve cut the loop up into its four corresponding beats.
As you can hear from the audio sample below, listening to this loop for a whole song will get really boring.
Step 2: Label Each Hit
When you start cutting up loops like this, you’ll want to keep track of which waveform is which. Labeling each hit makes it easier to move around, since you know exactly what you’ll be grabbing and moving to another spot.
The simple loop we’re using is pretty straightforward, since it’s only kick and snare, but let’s label it anyway. I’m using Logic’s text tool to individually name each region, and as always, use a similar tool in your DAW.

Step 3: Add an Extra Kick

The first thing you can do is simply add some extra hits to your loop. I’ve doubled the loop by duplicating it to the next four bars. Just so that we add a little variety I’ve copied an extra kick before the end of the first loop, creating a grace hit.

Step 4: Add an End of Measure Fill

Let’s keep re-arranging our kicks and snares to kind of close it up. I’ve basically added a few kicks on the last bars for variation.
By now we’ve tripled the length of our kick and snare loop and given it enough variation so that it doesn’t bore us to death.
Step 5: Add Cymbals
If you have an extra cymbal crash handy you can create a new channel and add it to the end of the loop. Crashes and cymbals are really good at creating variation, and by just adding a few here and there you create a completely different loop.
I’ve added a splash cymbal at the beginning, a crash after the kick/snare fill and then a choked crash to signal the end of the loop. If the loop were to repeat the choked crash would fit it nicely with the splash at the beginning.
Step 6: Make Fills
If you have a slightly more complex drum loop, you can create simple fills to end the phrase. The following drum loop has a little more going for it, but it’s still simple enough to easily edit.
As you can see, I’ve already cut up the loop, labeled it and spliced it together in a different way. The first four bars (and the first five regions) have the original loop that you can hear below.
I want to create a fill with by using the double-kick part of the loop as well as the snare, so I’ve spliced them together to create this fill:
Nothing spectacular, but definitely usable as a fill.
To take it a step further, I’ve added some crash cymbals to really accent that fill.

Conclusion

These simple steps can take a boring drum loop and make something a little more bearable to listen to. By adding extra kick or snare hits you can variate your loops to avoid the repetitious and monotonous sound a simple four bar loop makes. Variating the fills and beats every other bars is sometimes enough, especially if the song you are creating isn’t heavy on the drums and only needs a simple beat.
Hacking up drum loops like this won’t replace a drummer, but if you only need to flesh an idea out it can come in handy. You’ll avoid the boring sound of a simple drum loop repeating over and over again, and you won’t have to deal with trying to create a beat in a sequencer or recording a real drum kit. Don’t just follow these steps, try to make your own little fills and recycle your old loops to keep your production interesting.

Tuesday, November 15, 2011

Audio Effects

Equalization

Equalization means boosting or reducing (attenuating) the levels of various frequencies in a signal. At it's most basic, equalization can mean turning the bass/treble controls up or down. Advanced equalizers have fine controls for specific frequencies.
Common uses for equalization include correct signals which sound unnatural and reducing feedback.
More info: Audio Equalization

Compression & Limiting

Compression means reducing the dynamic range of a signal. All signal values above a certain adjustable threshold are reduced in gain relative to lower-level signals. This creates a more even signal level, reducing the level of the loudest parts.
More info: Audio Compression
Limiting is an extreme form of compression. Rather than smoothly reducing the gain of successively higher levels, all signal above the threshold is limited to the same gain. This creates a very hard cut-off point, over which there is no increase in level.
More info: Audio Limiting

Expansion & Noise Gating

Expansion means increasing the dynamic range of a signal. High level signals maintain the same (or nearly the same) levels, low level signals are reduced (attenuated). This creates a greater range between quiet and loud. Expansion is the opposite of compression.
Noise gating is an extreme form of expansion — signals below a certain point are either heavily attenuated or eliminated completely. This leaves only higher level signals and removes background noise when the signal is not present.
More info: Audio Expansion

Delay / Echo

Delay is a simple concept — the original audio signal is followed closely by a delayed repeat, just like an echo. The delay time can be as short as a few milliseconds or as long as several seconds. A delay effect can include a single echo or multiple echoes, usually reducing quickly in relative level.
Delay also forms the basis of other effects such as reverbchorusphasing and flanging.

Reverb

Reverb is short for reverberation, the effect of many sound reflections occurring in a very short space of time. The familiar sound of clapping in an empty hall is a good example of reverb.
Reverb effects are used to restore the natural ambience to a sound, or to give it more fullness and body.
More info: Audio Reverb

Chorus

The chorus effect is designed to make a signal sound like it was produced by multiple similar sources. For example, if you add the chorus effect to a solo singer's voice, the results sounds like.... a chorus.
Chorus works by adding multiple short delays to the signal, but rather than repeating the same delay, each delay is "variable length" (the speed and length of the delay changes). This adds the randomness required for the chorus sound. Varying the delay time also varies the pitch slightly, further adding to the "multiple sources" illusion.
More info: Chorus Effect

Phasing & Flanging

Phasing, AKA phase shifting, is a sweeping, whooshing effect often used in music. The effect is created by mixing the original signal with another version of itself which has been phase-shifted. This results in various out-of-phase interactions over time which gives the sweeping effect.
Phasing is created by adding evenly-spaced notches in the frequency response and moving them up and down the frequency spectrum.
Flanging is a specific type of phasing which uses notches that are "harmonically related", i.e. related to musical notes.
More info: PhasingFlanging

Audio Equalization

The most basic type of equalization familiar to most people is the treble/bass control on home audio equipment. The treble control adjusts high frequencies, the bass control adjusts low frequencies. This is adequate for very rudimentary adjustments — it only provides two controls for the entire frequency spectrum, so each control adjusts a fairly wide range of frequencies.
Advanced equalization systems provide a fine level of frequency control. The key is to be able to adjust a narrower range of frequencies without affecting neighbouring frequencies.
Equalization is most commonly used to correct signals which sound unnatural. For example, if a sound was recorded in a room which accentuates high frequencies, an equalizer can reduce those frequencies to a more normal level. Equalization can also be used for applications such as making sounds more intelligible and reducing feedback.
There are several common types of equalization, described below.

Shelving EQ

In shelving equalization, all frequencies above or below a certain point are boosted or attenuated the same amount. This creates a "shelf" in the frequency spectrum.

Bell EQ

Bell equalization boosts or attenuates a range of frequencies centred around a certain point. The specified point is affected the most, frequencies further from the point are affected less.

Graphic EQ

Graphic equalizers provide a very intuitive way to work — separate slider controls for different frequencies are laid out in a way which represents the frequency spectrum. Each slider adjusts one frequency band so the more sliders you have, the more control.

Parametric EQ

Parametric equalizers use bell equalization, usually with knobs for different frequencies, but have the significant advantage of being able to select which frequency is being adjusted. Parametrics are found on sound mixing consoles and some amplifier units (guitar amps, small PA amps, etc).

Why You Should Use Metering Tools while Mixing and Mastering (logic)

Last AES convention I met a manufacturing rep for a very prestigious equipment company. He was demoing a piece of equipment for me, showing me all the great knobs and buttons that it had to offer. Then he said something along the lines of, “We don’t include a screen for these things since you’re supposed to mix with your ears.” That’s when I took my exit stage left. I think imposing a viewpoint like that is just plain wrong.

Obviously, you’re supposed to mix with your ears, but I don’t think looking at meters is going to destroy your mix.
I like visual EQs, where I can see how narrow my cuts are, and where I can visually sweep over the EQ spectrum. Similarly, I look at the gain reduction meter every time I compress something. It helps me get to where I want to go. There’s nothing wrong with looking at your plug-ins to see what you’re doing to the sound. Use it as an addition to your listening.
Don’t just mix visually without listening. That’s never going to work. Then everybody could have an amazing mix by just using those damned presets without changing a single thing.
No, use your ears, but don’t exclude helpful meters your plug-ins have to offer. They’re great when you’re starting out. They give you a handy visualization of what’s going on that’s especially helpful if your ears are inexperienced.

Enter the Meters

Logic’s multimeter is a great tool. It has a bunch of metering tools that you can take advantage of that work well for both mixing and mastering. Other audio programs all have some sort of meters that you can use.
I use the multimeter as a last resort when I can’t seem to figure out where the muddiness is. If the multimeter is clearly showing me an overabundance of a specific low end frequency (damn you 250 Hz!) then I’ll go back and try to cut that frequency from the usual suspects of low frequency instruments, such as bass, guitars, keyboards or drums. Many times it’s not actually the instruments themselves, but rather the reverb that’s muddying up the spectrum so I’ll go in and EQ the reverb to see if I can’t fix the mud.


RMS and Peak Level

When I master I tend to put the multimeter after all of the mastering plug-ins I’m using. It goes on after the EQ, Compression and the limiter. The reason I don’t just put it anywhere in the chain is because I need to know the final level of the song, and all those plug-ins will somehow alter the final level.
I use the limiter to make the song louder, and while I raise the level of the song I use the gain meter on the multimeter to tell me how loud the song is becoming. I try to aim for a level of around -12 to -9 dB, depending on the genre of the song. Therefore, watching the level meter closely while limiting gives me a really good idea of how loud the song will end up being.

Goniometer

I use the goniometer rarely, but I check it at least once while I’m mastering. The goniometer is sort of a phase meter. It tells you if your track has any phase problems. If the track stays somewhat in the middle, with no parts creating any weirdness you should be fine.
Another way to check is the correlation meter below. If the meter is close to all the way to the right, you shouldn’t be having any phase problems.
The reason I say I use the goniometer more while mastering rather than mixing is that while I’m mixing, I’d rather flip the output to mono and listen that way instead of relying on the meter. Since I’m mixing I’ll have more control over the individual elements of the mix. So if I flip the song into mono and something just vanishes from the mix, I know I have some phase problems. And since I’m mixing, I can go back to that instrument and fix it right then and there.
But if you’re mastering, you have less control over all the elements of the mix, and you’re almost screwed if the track you’re mastering has massive phase problems, since you can’t go back and fix it.

EQ and Compression

The gain reduction meter on your compressor is an invaluable tool when you’re compressing. It tells you by how much your compressor is compressing the signal, and you can easily see the attack and release times by looking at the meter.
A very useful thing when you’re trying to time your compressor to the beat of the track. And since it tells you how much you are compressing, it’s a handy way of knowing how much makeup gain you need to apply so that you’re at the same level as before you started compressing.
Similarly to the multimeter above, some EQs have frequency analyzers that show you what the signal looks like. In Logic you just press the button on the Channel EQ and it gives you a visual approximation of the frequencies of that signal. It can come quite in handy when your ears aren’t trained enough to hear where problematic frequencies are located.

Conclusion

Metering is a great way to visually see what the audio is doing. Slapping a multimeter and checking the frequency range of a multi-track is a great way to see if your mix has an overabundance of some frequency or other. Making your track loud but dynamic is also a priority in these days of over-compressed masters, so you have to know how hard you’re pushing your limiter and how loud you’re making your mix.
How do you use meters while mixing or mastering?

Thursday, April 14, 2011

Sound reproduction concepts

Methods of Synthesis

  • additive synthesis - combining tones, typically harmonics of varying amplitudes
  • subtractive synthesis - filtering of complex sounds to shape harmonic spectrum, typically starting with geometric waves.
  • frequency modulation synthesis - modulating a carrier wave with one or more operators
  • sampling - using recorded sounds as sound sources subject to modification
  • composite synthesis - using artificial and sampled sounds to establish resultant "new" sound
  • phase distortion - altering speed of waveforms stored in wavetables during playback
  • waveshaping - intentional distortion of a signal to produce a modified result
  • resynthesis - modification of digitally sampled sounds before playback
  • granular synthesis - combining of several small sound segments into a new sound
  • linear predictive coding - technique for speech synthesis
  • direct digital synthesis - computer modification of generated waveforms
  • wave sequencing - linear combinations of severtal small segments to create a new sound
  • vector synthesis - technique for fading between any number of different sound sources
  • physical modeling - mathematical equations of acoustic characteristics of sound

Saturday, April 9, 2011

why should we measure sound?


To know more about something we need to measure them, this not only enables us to understand a particular criterion better but also helps us to device methodologies enabling us to control the same. The same applies to sound.

The measurement of sound will help us to precisely and scientifically control the unwanted sounds. Moreover the intensity of sound tends to play a very important role in ones hearing capability. Exposure to high levels of sound can cause damage to the ears and its sensitivity to hear. This is done separately in a field of study known as audiometry.

The various methods by which we measure sound are as follows:
  • Sound Pressure Level
  • Sound Intensity Level
  • Sound Power Level
  • Frequency Spectrum
  • Frequency response function.

Friday, April 8, 2011

Sound Wave Properties


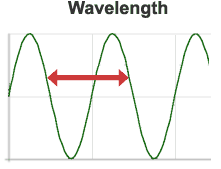
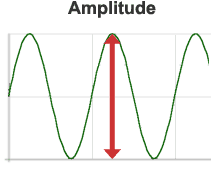
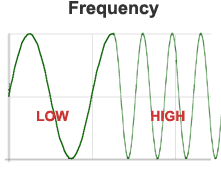
All waves have certain properties. The three most important ones for audio work are shown here:
Wavelength: The distance between any point on a wave and the equivalent point on the next phase. Literally, the length of the wave. Wavelength
Amplitude: The strength or power of a wave signal. The "height" of a wave when viewed as a graph.
Higher amplitudes are interpreted as a higher volume, hence the name "amplifier" for a device which increases amplitude.
Amplitude
Frequency: The number of times the wavelength occurs in one second. Measured in kilohertz (Khz), or cycles per second. The faster the sound source vibrates, the higher the frequency.
Higher frequencies are interpreted as a higher pitch. For example, when you sing in a high-pitched voice you are forcing your vocal chords to vibrate quickly.
Frequency